“This post contains affiliate links. As an Amazon Associate, I earn from qualifying purchases”
Raising chicken eggs in an incubator can be a rewarding experience for beginners and seasoned poultry enthusiasts alike. Whether you’re looking to expand your flock or just curious about the hatching process, this guide will walk you through everything you need to know. From gathering supplies to caring for your new chicks, we’ll cover it all step by step. Let’s get started!
Key Takeaways
- Ensure you have all necessary supplies like a good incubator and fertile eggs.
- Maintain proper temperature and humidity throughout the incubation process.
- Regularly turn the eggs to promote healthy embryo development.
- Candle the eggs to monitor growth and identify any issues.
- Prepare a safe brooder environment for the chicks after they hatch.
Essential Supplies For Incubating Chicken Eggs
So, you’re thinking about hatching your own chicks? That’s awesome! But before you jump in, you’ll need to gather some essential supplies. Trust me, having everything ready beforehand will make the whole process way smoother. Let’s break down what you’ll need:
Hatching Eggs
Obviously, you can’t hatch chicks without eggs! But not just any eggs will do. You need fertile eggs specifically intended for hatching. These are different from the ones you buy at the grocery store.
- Source your eggs from a reputable breeder or hatchery. This increases the likelihood of fertility and healthy chicks.
- Handle the eggs with care. Avoid washing them, as this removes the protective coating.
- Store the eggs properly before incubation. Keep them in a cool (55-65°F), humid place, pointed end down, and turn them a couple of times a day if you’re not starting incubation right away.
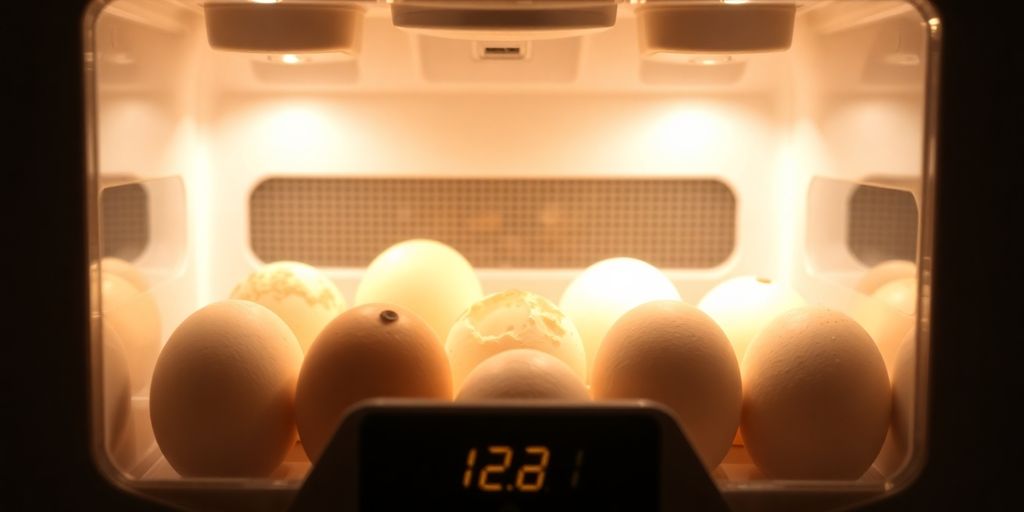
Incubator Setup
This is where the magic happens! Your incubator is going to be the chick’s home for the next 21 days, so it’s important to get it right. There are a ton of different models out there, from basic styrofoam ones to fancy automatic ones. The VEVOR Incubator is a popular choice.
- Incubator: Choose an incubator that fits your needs and budget. Consider features like automatic turning, temperature control, and humidity control.
- Thermometer and Hygrometer: Even if your incubator has built-in gauges, it’s a good idea to have separate ones to double-check the temperature and humidity. Accuracy is key!
- Water Source: You’ll need a way to add water to the incubator to maintain humidity. This could be as simple as a water tray or as sophisticated as an automatic humidity control system.
Getting the incubator set up correctly from the start is super important. Make sure you read the instructions carefully and understand how to adjust the temperature and humidity. A little preparation goes a long way!
Candling Light
Candling is the process of shining a bright light through the egg to check for development. It’s like giving your eggs a little ultrasound! A candling light is a small, bright flashlight specifically designed for this purpose.
- Choose a candling light with a strong, focused beam. LED lights are a good option because they don’t produce much heat.
- Candling is best done in a dark room. This will make it easier to see inside the egg.
- Be gentle when handling the eggs during candling. You don’t want to damage the developing embryo.
Here’s a quick guide on when to candle:
| Day | What to Look For
Understanding The Incubation Process
Incubation Timeline
Okay, so you’ve got your eggs and your incubator all set up. Now what? Well, the next three weeks are all about patience and consistency. The incubation timeline is pretty specific, and sticking to it is key for a successful hatch. Think of it like baking a cake – you can’t just pull it out of the oven whenever you feel like it! Each day brings crucial development for those little chicks inside.
Here’s a super basic breakdown:
- Days 1-7: Early development – blood vessels start forming, and the heart begins to beat.
- Days 8-14: Limbs and organs develop further. This is when candling egg development becomes really useful to check progress.
- Days 15-18: The chick starts to position itself for hatching.
- Days 19-21: Hatching time! Get ready for some action.
Temperature and Humidity Control
Temperature and humidity are probably the two biggest things you need to keep an eye on. Too hot or too cold, too humid or not humid enough, and you’re going to have problems. Most chicken eggs need to be incubated at around 99-102°F (37.2-38.9°C). Humidity should be around 50-65% for the first 18 days, then bumped up to 65-75% for the last few days before hatching. I use a digital thermometer/hygrometer to keep track, and I check it at least twice a day.
It’s better to err on the side of slightly cooler than too hot. Overheating can cause serious problems, while a little coolness just might delay the hatch by a day or so.
Here’s a quick reference table:
| Stage | Temperature (°F) | Humidity (%) |
|---|---|---|
| Days 1-18 | 99-102 | 50-65 |
| Days 19-21 | 99-102 | 65-75 |
Egg Turning Techniques
Egg turning is important because it prevents the embryo from sticking to the side of the shell. If you have an automatic egg turner, great! If not, you’ll need to turn the eggs manually at least 3-5 times a day. I usually do it in the morning, at lunchtime, and before bed. Make sure you turn them an odd number of times so they aren’t sitting on the same side overnight. Some people mark one side of the egg with an “X” and the other with an “O” to help keep track. Here are some tips for successful egg incubation:
- Turn eggs gently to avoid damaging the developing embryo.
- Ensure all eggs are turned at a similar angle.
- Wash your hands before handling the eggs to prevent contamination.
Preparing The Incubator For Hatching
Getting your incubator ready for hatching is super important. It’s like prepping a nursery before a baby arrives – you want everything just right for the little ones coming into the world. This stage focuses on making sure the incubator is clean, the environment is stable, and you’re all set for those chicks to make their grand entrance.
Cleaning The Incubator
Before you even think about putting eggs in, give that incubator a good scrub. I usually start by unplugging it (safety first!). Then, I remove all the trays and any other removable parts. Warm, soapy water works wonders for cleaning the inside. Just make sure you rinse everything really well to get rid of any soap residue. Avoid using harsh chemicals or strong disinfectants, because those can actually harm the developing embryos. Let everything dry completely before you put it back together. A clean incubator helps prevent bacteria from messing with your hatch.
Setting Up The Environment
Once the incubator is clean and dry, it’s time to set up the environment. This means getting the temperature and humidity dialed in. For most chicken eggs, you’re aiming for a temperature around 99.5°F (37.5°C) in a forced-air incubator. Humidity is a bit trickier. During the first 18 days, keep it around 50-65%. Then, for the last three days (the “lockdown” period), you’ll want to bump that up to 65-70%. This higher humidity helps the chicks hatch successfully. Make sure you have a reliable thermometer and hydrometer to keep an eye on things. Also, if your incubator has adjustable ventilation, set it according to the manufacturer’s instructions. If you don’t have instructions, start with the vents halfway open.
Monitoring Conditions
After you’ve set everything up, don’t just walk away! You need to keep a close eye on the temperature and humidity for at least 24 hours before you put the eggs in. This gives you a chance to make sure everything is stable and working correctly. I check mine a few times a day, just to be sure. It’s also a good idea to have a backup plan in case something goes wrong, like a power outage. A little preparation can save you a lot of heartache later on. If you’re building a DIY egg incubator cabinet, make sure you test it thoroughly before relying on it.
Getting the incubator environment right is key. Think of it as creating the perfect little world for those chicks to grow in. Consistent temperature and humidity are non-negotiable, so take the time to get it right. It’ll make a huge difference in your hatch rate.
Egg Candling Techniques
Egg candling is a super cool way to peek inside your chicken eggs without cracking them open! It lets you see if there’s a chick developing inside. It’s like having X-ray vision for eggs. You’ll need a dark room and a bright light, called a candler. Some people use a strong flashlight, but you can also buy special egg candling lights online. The basic idea is to shine the light through the eggshell to see what’s going on inside.
When To Candle Eggs
Okay, so when should you actually candle your eggs? Most people candle eggs at least twice during the incubation period. The first time is usually around day 7 to 10. This is when you can start to see if there are blood vessels forming, which means a chick is developing. The second time is around day 14 to 18. This lets you check on the chick’s progress and make sure everything is still looking good. Some folks even do a third candling closer to hatching time, but it’s not always necessary. I usually stick to two times – day 7 and day 14.
What To Look For
Alright, you’ve got your candler and your eggs. Now what? Here’s a quick rundown of what to look for:
- Day 7-10: Look for a network of tiny blood vessels spreading out from a dark spot. This means you’ve got a developing embryo! If the egg is completely clear, it’s probably infertile. If you see a blood ring (a ring of blood inside the egg), it means the embryo died early on.
- Day 14-18: You should see a larger dark mass taking up a good portion of the egg. You might even see movement if you’re lucky! The air cell at the blunt end of the egg should also be getting bigger. Again, if the egg is clear or has a blood ring, it’s a no-go.
It’s important to be gentle when handling the eggs during candling. You don’t want to jostle them too much or risk damaging the developing embryo. Also, don’t keep the eggs out of the incubator for too long – temperature is key!
Interpreting Results
So, you’ve candled your eggs and seen some stuff. Now what does it all mean? Here’s a simple guide:
| Finding | Interpretation | Action |
|---|---|---|
| Blood Vessels | Developing embryo | Leave in incubator |
| Clear Egg | Infertile or very early death | Remove from incubator |
| Blood Ring | Embryo died | Remove from incubator |
| Dark Mass | Healthy, developing chick | Leave in incubator |
| No Movement | Could be okay, but monitor closely | Monitor |
If you find any infertile eggs or eggs with dead embryos, remove them from the incubator right away. They won’t hatch, and they could potentially contaminate the other eggs. Don’t get discouraged if you have some losses – it happens! Just keep an eye on the remaining eggs and hope for the best. Remember to keep a hatching eggs log to track your progress.
Hatching Day Expectations
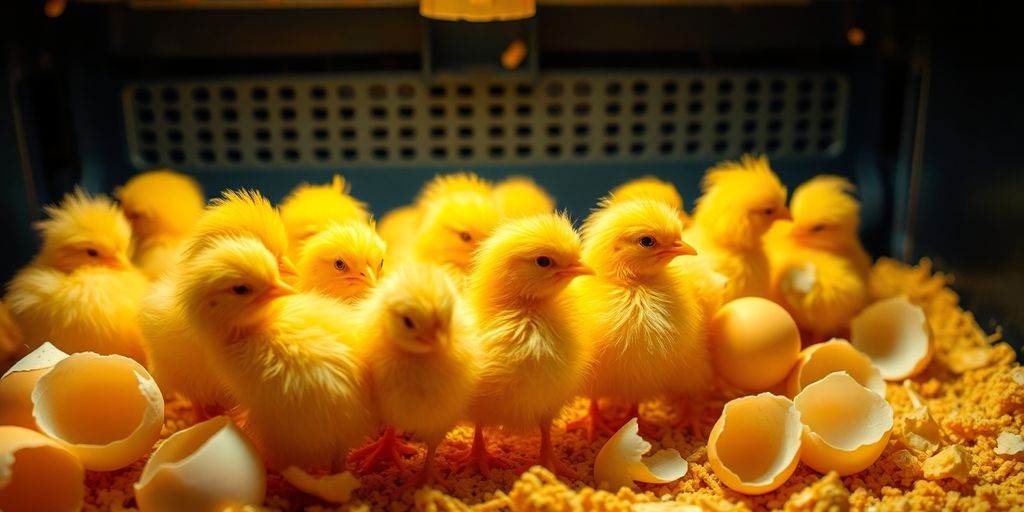
Hatching day is exciting! After all the work of incubation, it’s time to see those chicks emerge. It’s important to have realistic expectations and be prepared for what’s to come. Not every egg will hatch, and that’s okay. Let’s walk through what you can expect.
Signs Of Hatching
So, how do you know when hatching is starting? The first sign is usually a “pip” – a small hole pecked in the shell. This is where the chick starts to break through. You might also hear peeping sounds coming from inside the eggs. After the initial pip, the chick will start to “unzip” the egg, creating a larger crack around the shell. This process can take several hours, so patience is key. Don’t be surprised if you see the eggs wobble or move slightly as the chicks work their way out. Remember that egg development varies, so some eggs might hatch sooner than others.
Handling Newly Hatched Chicks
Once a chick hatches, it will be wet and exhausted. It’s best to leave it in the incubator until it’s fully dry and fluffy. This usually takes a few hours. The incubator provides a warm and safe environment for the chick to recover. Once the chick is dry, you can move it to a preheated brooder. Make sure the brooder is ready with food and water. When you move the chicks, handle them gently and avoid squeezing them. They are fragile at this stage.
Common Challenges
Hatching isn’t always smooth sailing. Here are some common challenges you might encounter:
- Sticking to the shell: Sometimes, a chick will have trouble breaking free from the shell. This can be due to low humidity during incubation. Resist the urge to help the chick unless it’s clear it’s in distress and the membrane is dried and tight. If you do assist, do so very carefully, peeling away small pieces of shell at a time.
- Delayed hatching: Not all eggs hatch at the same time. Some may hatch a day or two later than others. As long as the chick is still alive and pipping, give it time.
- Weak chicks: Some chicks may hatch but appear weak or lethargic. This can be due to various factors, including poor nutrition in the hen’s diet or problems during incubation. Provide these chicks with extra care and attention in the brooder.
It’s important to remember that hatching rates can vary. Don’t be discouraged if you don’t get a 100% hatch rate. Even experienced poultry keepers experience losses. Focus on providing the best possible environment for the chicks that do hatch, and learn from any challenges you encounter. A good incubator setup is key to success.
Post-Hatching Care For Chicks
So, the big day has arrived, and you’ve got a bunch of fluffy little chicks! Now what? Taking care of them after they hatch is just as important as the incubation process itself. It’s all about creating the right environment and making sure they get everything they need to grow up healthy and strong. Let’s get into it.
Setting Up The Brooder
Think of the brooder as your chicks’ first home. It needs to be warm, safe, and clean. You can use a large plastic tub, a wooden box, or even a kiddie pool. The important thing is that it’s draft-free and easy to clean. Here’s what you’ll need:
- Heat Source: A heat lamp is ideal. Start with the lamp about 18 inches above the floor of the brooder and adjust the height to maintain the right temperature. You’ll want to monitor the chicks’ behavior to make sure they aren’t too hot or too cold.
- Bedding: Pine shavings are a good choice. Avoid newspaper or slick surfaces, as these can cause leg problems. Replace the bedding regularly to keep things clean.
- Space: Make sure there’s enough room for the chicks to move around freely. Overcrowding can lead to stress and health issues.
Feeding And Watering
Chicks need constant access to fresh food and water. Here’s how to set it up:
- Feed: Use a chick starter feed, which is specially formulated to meet their nutritional needs. Sprinkle some of the feed on the floor of the brooder for the first few days to help them find it. You can also use a chick feeder to prevent waste.
- Water: Use a shallow dish or a chick waterer to prevent them from drowning. Fresh water is essential, so clean and refill the waterer daily. Add some marbles or small stones to the water dish to prevent chicks from falling in and getting wet.
It’s important to observe your chicks closely during the first few days. Make sure they’re eating and drinking, and that they’re active and alert. If you notice any signs of illness, such as lethargy or diarrhea, isolate the affected chick and seek advice from a vet or experienced poultry keeper.
Health Monitoring
Keeping an eye on your chicks’ health is crucial for preventing problems down the road. Here are a few things to watch out for:
- Pasty Butt: This is a common problem in young chicks, where their vent becomes blocked with dried feces. Gently clean the area with a warm, damp cloth to clear the blockage.
- Leg Problems: Watch for signs of spraddle leg or other leg deformities. Providing proper bedding and ensuring they have access to the right nutrients can help prevent these issues.
- Respiratory Issues: Listen for sneezing, coughing, or other signs of respiratory distress. Ensure the brooder is well-ventilated but not drafty.
Here’s a quick guide to brooder temperature based on the chicks’ age:
| Age (Weeks) | Temperature (°F) | Temperature (°C) |
|---|---|---|
| 0-1 | 95 | 35 |
| 1-2 | 90 | 32 |
| 2-3 | 85 | 29 |
| 3-4 | 80 | 27 |
| 4-5 | 75 | 24 |
| 5-6 | 70 | 21 |
Remember to adjust the temperature based on the chicks’ behavior. If they’re huddled together under the heat lamp, they’re too cold. If they’re spread out and panting, they’re too hot. The goal is to find a happy medium where they’re comfortable and active. By following these guidelines, you’ll be well on your way to raising healthy and happy chicks. Don’t forget to check out resources on raising baby chicks for more information!
Troubleshooting Common Issues
Low Hatch Rates
So, you’ve waited patiently, followed all the steps, and… your hatch rate is disappointing. It happens! Don’t beat yourself up. Low hatch rates can stem from a bunch of different things. First, consider the eggs themselves. Were they fertile? Were they stored properly before incubation? Older eggs, or eggs stored in extreme temperatures, are less likely to hatch.
Here’s a quick checklist to consider:
- Egg quality and fertility
- Incubation temperature fluctuations
- Humidity levels (too high or too low)
- Inadequate egg turning
Also, think about your incubator. Is it maintaining a consistent temperature? Is the humidity where it needs to be? Sometimes, even a small fluctuation can impact your hatch rate. Make sure you’re using a reliable thermometer and hygrometer to monitor things closely. If you’re using an older incubator, it might be time to consider upgrading or at least replacing some parts. You can find replacement parts online.
Egg Development Problems
Sometimes, you’ll candle your eggs and see something isn’t quite right. Maybe you see a blood ring, or maybe the egg is clear after a week. These are signs of egg development problems. A blood ring usually means the embryo started to develop but then died early on. A clear egg often means it was never fertile to begin with.
Here’s what to look for when candling:
- Clear Egg (Infertile): No visible development after several days.
- Blood Ring: A distinct ring of blood vessels, indicating early embryonic death.
- Dark Mass: Normal development, embryo visible and growing.
- Stalled Development: Development starts but stops prematurely.
It’s important to remember that not every egg will develop perfectly. Sometimes, it’s just bad luck. But if you’re seeing a lot of eggs with development problems, it’s worth investigating your incubation practices. Are you turning the eggs enough? Is the temperature consistent? These factors can all play a role.
Incubator Malfunctions
Incubators aren’t perfect, and sometimes they break down. The incubator heat element could fail, the thermostat could go haywire, or the fan could stop working. Any of these malfunctions can be disastrous for your developing chicks. That’s why it’s so important to check your incubator regularly and make sure everything is working as it should.
Here are some common incubator issues and how to address them:
- Temperature Fluctuations: Check the thermostat and heating element. Consider a backup thermostat.
- Humidity Issues: Ensure the water reservoir is filled and the hygrometer is accurate. Adjust ventilation as needed.
- Fan Failure: Replace the fan immediately to maintain proper air circulation and temperature distribution.
Wrapping It Up
Hatching chicken eggs can be a really exciting adventure, whether you’re a kid or just young at heart. Sure, it takes some time and a bit of patience, but when you finally see those little chicks breaking out of their shells, it’s all worth it. You’ve learned how to set up your incubator, check the eggs, and get everything ready for hatch day. Just remember, when the big day comes, take a deep breath and let nature do its thing. Before you know it, you’ll be holding a tiny chick that just made its grand entrance into the world!
Frequently Asked Questions
What supplies do I need to incubate chicken eggs?
You will need a good incubator, fertile eggs, a candling light, distilled water for humidity, and a hydrometer to check humidity levels.
How long does it take for chicken eggs to hatch?
It usually takes about 21 days for chicken eggs to hatch, but you need to keep the incubator at the right temperature and humidity during this time.
What is candling and why is it important?
Candling is when you shine a light through the egg to see if the embryo is developing. It helps you check if the eggs are viable and how they are growing.
How do I turn the eggs in the incubator?
If your incubator doesn’t turn the eggs automatically, you should turn them by hand at least three times a day. You can mark the eggs with an ‘X’ and ‘O’ to remember which side is up.
What should I do on hatching day?
On hatching day, be patient! You might see cracks in the eggs, and it can take several hours for chicks to fully hatch. Avoid opening the incubator too soon.
How can I care for the chicks after they hatch?
After the chicks hatch, move them to a warm brooder with food and water. Keep an eye on their health and make sure they are comfortable.