“This post contains affiliate links. As an Amazon Associate, I earn from qualifying purchases”
If you’re thinking about how to raise chickens to lay eggs, you’re in for a rewarding experience! Not only will you get fresh eggs right from your backyard, but you’ll also enjoy the process of caring for these charming creatures. This guide will walk you through everything from choosing the right chicks to setting up their home and keeping them healthy. Let’s dive into the essentials of raising chickens for egg production!
Key Takeaways
- You can enjoy fresh, delicious eggs every day.
- Raising chickens can be a fun and educational experience for kids.
- Spring is the best time to start raising chicks for optimal growth.
- Choosing the right breed is key for good egg production.
- Regular care and proper coop maintenance are essential for healthy chickens.
Understanding The Benefits Of Raising Chickens
So, you’re thinking about raising chickens? Awesome! It’s more than just a quirky hobby; it’s a lifestyle with some pretty cool perks. Let’s break down why keeping chickens might be the best decision you make this year.
Fresh Eggs Daily
Okay, this one’s obvious, but it’s worth emphasizing. Forget those grocery store eggs that have been sitting around for weeks. Imagine walking out to your backyard and collecting warm, fresh eggs every morning. The taste difference alone is a game-changer. Plus, you know exactly where your food is coming from and how the chickens are treated. It’s a win-win.
Educational Experience For Kids
If you’ve got kids, raising chickens is like having a living science project in your backyard. They’ll learn about where food comes from, animal care, and even a bit about biology. It teaches responsibility too – someone’s gotta feed and water those birds! Watching chicks grow is fascinating, and it’s a great way to get kids connected to their food and nature.
Self-Sufficiency And Sustainability
In a world where things often feel out of our control, raising chickens can give you a sense of self-sufficiency. You’re producing your own food, reducing your reliance on the grocery store, and contributing to a more sustainable lifestyle. Chickens also help with pest control by eating bugs in your yard, and their manure makes excellent fertilizer for your garden. It’s a small step towards a more sustainable way of living. Plus, there’s a certain satisfaction in knowing you can raise baby chicks and provide for yourself and your family.
Raising chickens offers a unique blend of benefits, from providing fresh, high-quality eggs to fostering a deeper connection with nature and promoting self-sufficiency. It’s a rewarding experience that can enrich your life in unexpected ways.
Choosing The Right Time To Start Raising Chicks
Timing is really important when you’re thinking about getting chicks. It’s not just about when you’re ready, but also about what’s best for the little guys. You want to set them up for success, and a big part of that is picking the right season and understanding their needs.
Ideal Seasons For Chickens
Spring is generally considered the best time to start raising chicks. The weather is milder, which is easier on the chicks as they adjust. Think about it – they’re tiny and need a stable environment. Summer can get too hot, and winter is definitely too cold, especially in many parts of the country. Fall could work, but then you’re racing against the clock to get them big enough to handle the winter months. April or May are often ideal, but it depends on your local climate. You can also purchase laying hens if you’d rather skip the chick-raising process.
Understanding Temperature Needs
Chicks are super sensitive to temperature, especially in their first few weeks. They need a brooder that’s consistently warm. We’re talking around 90-95°F (32-35°C) for the first week, then you gradually reduce the temperature by about 5 degrees each week until they’re fully feathered. If they’re huddled together under the heat lamp, they’re too cold. If they’re spread out and panting, they’re too hot. Finding that sweet spot is key. Here’s a quick guide:
- Week 1: 90-95°F (32-35°C)
- Week 2: 85-90°F (29-32°C)
- Week 3: 80-85°F (27-29°C)
- Week 4: 75-80°F (24-27°C)
- Week 5: 70-75°F (21-24°C)
- Week 6: 65-70°F (18-21°C)
It’s better to err on the side of caution and keep them a little warmer than too cold. Chilling can be deadly for young chicks. Make sure you have a reliable thermometer in the brooder to monitor the temperature closely.
Timing For Feather Growth
Feathers are a chick’s natural insulation, and they need to be fully feathered before they can handle cooler temperatures outside. This usually takes around 5-6 weeks. So, when you’re planning when to get your chicks, factor in that time. You don’t want to move them to the coop too early, before they’re ready. This is why starting in the spring is often best – it gives them plenty of time to grow their feathers before the weather turns cold again. You can order them online from some type of chick hatchery.
Finding The Best Sources For Chicks
Okay, so you’re ready to get some chicks! That’s awesome. But where do you even find these little fluffballs? There are actually a few different ways to get your hands on chicks, and each has its own pros and cons. Let’s break it down.
Local Hatcheries
One of the best ways to get chicks is from a local hatchery. This allows you to see the chicks in person before you buy them, and you can often get advice from the hatchery staff. Plus, you’re supporting a local business, which is always a good thing. The downside? Local hatcheries might have limited breeds available, and their prices could be a bit higher than online options. But the peace of mind knowing where your chicks came from? Totally worth it for some people.
Online Chick Suppliers
Ordering chicks online is super convenient. You can choose from a huge variety of breeds, and the chicks are shipped right to your door. It’s like online shopping, but with live animals! However, there are a few things to keep in mind. First, you’ll need to order a minimum number of chicks to ensure they stay warm during shipping. Second, there’s always a risk that some chicks might not survive the journey. Make sure you do your research and choose a reputable supplier with good reviews. Also, check their policies on chick replacement if some don’t make it. It’s also important to consider the time of year; shipping chicks in extreme heat or cold can be risky.
Hatching Your Own Eggs
If you already have chickens (and a rooster!), you can hatch your own eggs. This is a really rewarding experience, and it’s a great way to learn about the chicken life cycle. You’ll need an incubator to keep the eggs at the right temperature and humidity, and you’ll need to turn the eggs several times a day. It takes about 21 days for the eggs to hatch, and it’s so exciting to watch the chicks emerge. Of course, there’s no guarantee that all the eggs will hatch, and you’ll need to be prepared to care for the chicks once they do. Plus, you’ll end up with a mix of hens and roosters, which might not be ideal if you’re only interested in egg production.
Getting chicks is a big step, so take your time and do your research. Think about what’s important to you – breed selection, price, convenience – and choose the source that best fits your needs. Happy chickening!
Setting Up A Comfortable Brooder
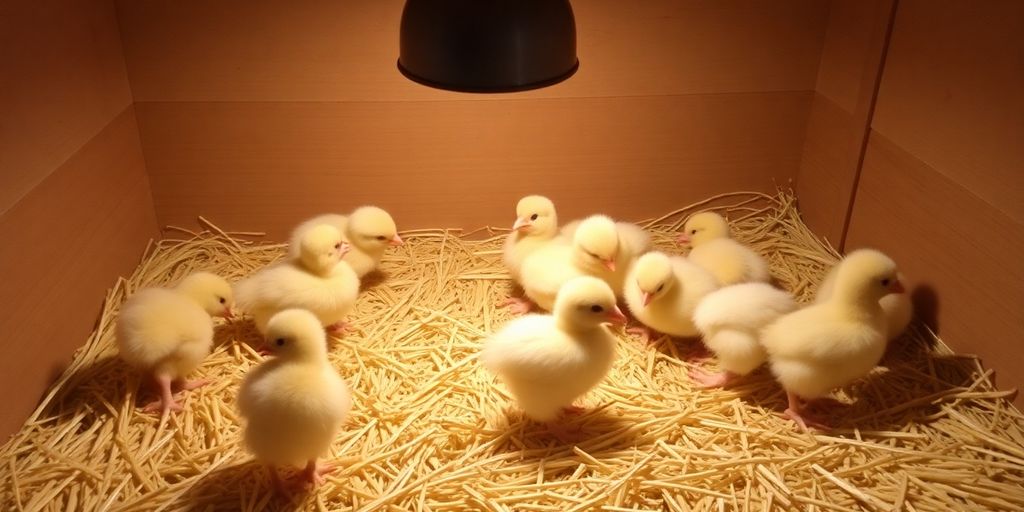
Okay, so you’ve got your chicks on the way! Exciting, right? But before they arrive, you need to get their temporary home ready: the brooder. Think of it as their nursery. A good brooder setup is super important for keeping them healthy and happy during those first few weeks. It’s more than just a box; it’s their safe space.
Essential Equipment For Chicks
First things first, you’ll need the basics. A brooder itself can be a large plastic tub, a wooden box, or even a collapsable animal crate – something that keeps them contained and safe from drafts. Here’s a quick checklist:
- Heat Source: This is non-negotiable. Chicks need warmth, especially in the beginning. Heat lamps are common, but I prefer heat plates. They’re adjustable and feel more natural to the chicks.
- Bedding: Skip the newspaper; it’s too slippery. Go for pine shavings. They absorb moisture and are easy to clean. Just make sure they’re not cedar shavings, which can be harmful.
- Feeder and Waterer: Get chick-specific feeders and waterers. These are designed to prevent chicks from falling in or making a mess. I like the ones that keep the food and water clean.
- Thermometer: Keep an eye on the temperature. You’ll need to adjust the heat source as the chicks grow.
Maintaining Proper Temperature
Temperature is key. Newly hatched chicks need a brooder temperature of around 95°F (35°C) during their first week. After that, you can lower the temperature by about 5 degrees each week until they’re fully feathered. Here’s a simple guide:
| Week | Temperature (°F) | Temperature (°C) |
|---|---|---|
| 1 | 95 | 35 |
| 2 | 90 | 32 |
| 3 | 85 | 29 |
| 4 | 80 | 27 |
| 5 | 75 | 24 |
| 6+ | Room Temperature | Room Temperature |
Make sure to observe your chicks. If they’re huddled together under the heat source, they’re too cold. If they’re spread out and panting, they’re too hot. Adjust accordingly!
Providing Food And Water
Chicks need constant access to food and water. Use chick starter feed, which has the right nutrients for their growth. I like to sprinkle in some electrolytes and vitamin packs during the first week to give them a boost. Make sure the water is always clean and fresh. You’ll be surprised how quickly they can dirty it!
Keep the brooder clean. Change the bedding regularly to prevent the buildup of ammonia, which can be harmful to the chicks’ respiratory systems. Spot clean daily and do a full clean-out once a week. As they grow, you’ll need to replace the wood shavings more often. A plastic shovel will come in handy for scooping out the old bedding.
Caring For Your Chickens As They Grow
Transitioning To The Coop
Okay, so your chicks are getting bigger, and that brooder is starting to feel real small. Time to think about moving them to the coop! This is a pretty big step, and you want to make it as smooth as possible for everyone involved. Usually, around 6-8 weeks, they’ll have most of their feathers and can handle the outside temps, but keep an eye on the weather. If it’s still chilly at night, maybe hold off a bit longer.
Here’s a simple way to think about it:
- Feather Check: Mostly feathered out? Good to go.
- Temperature Watch: Nights above 50°F (10°C)? Ideal.
- Gradual Introduction: Don’t just dump them in! More on that below.
Integrating them with an existing flock? That’s a whole other ballgame. You don’t want a chicken war breaking out. A good way to start is by putting the brooder inside the coop for a few days, so everyone can get used to each other through the wire. Then, supervised visits in the run are a good idea. Watch for bullying! If the older hens are being too rough, separate them again and try again later. Patience is key here. You can also try setting up a separate area within the coop using chicken wire, giving the chicks a safe space while still allowing interaction. This helps them slowly integrate without being directly attacked. Remember to provide multiple feed locations to reduce competition during feeding times.
Health And Nutrition Needs
As your chickens grow, their nutritional needs change. What worked for tiny chicks won’t cut it for growing pullets and laying hens. Make sure you’re switching to age-appropriate feed. Pullet feed has different protein levels than chick starter, and layer feed has added calcium for strong eggshells. Speaking of calcium, oyster shells are a great supplement to offer free-choice. They’ll eat them as needed. Also, always provide fresh, clean water. It sounds obvious, but it’s super important.
Here’s a quick rundown:
- Chick Starter (0-8 weeks): High protein for growth.
- Pullet Grower (8-20 weeks): Balanced nutrition for development.
- Layer Feed (20+ weeks): Added calcium for egg production.
Don’t forget about grit! Chickens don’t have teeth, so they need grit to help them digest their food. If they’re free-ranging, they’ll probably find enough on their own, but if they’re mostly confined to a run, you’ll need to provide it.
And keep an eye out for any signs of illness. Common problems include mites, lice, and coccidiosis. Regular coop cleaning and dusting with diatomaceous earth can help prevent these issues. If you notice a sick chicken, isolate it immediately to prevent the spread of disease. Consult a vet or experienced chicken keeper for advice on treatment.
Socialization And Handling Tips
Chickens are social creatures, and they need interaction, both with each other and with you. The more you handle them when they’re young, the friendlier they’ll be as adults. Start by just spending time near them, talking softly. Then, try offering treats from your hand. Mealworms are like chicken crack – they’ll come running!
Here are some tips for socializing your flock:
- Regular Interaction: Spend time with them daily.
- Treats: Use treats to build trust.
- Gentle Handling: Pick them up gently and hold them securely.
Avoid sudden movements or loud noises, which can scare them. If you have kids, teach them how to handle the chickens gently and respectfully. A stressed chicken is an unhappy chicken, and unhappy chickens don’t lay as many eggs. Plus, a well-socialized flock is just more fun to have around! You might even consider raising backyard chickens as a family activity, teaching responsibility and animal care.
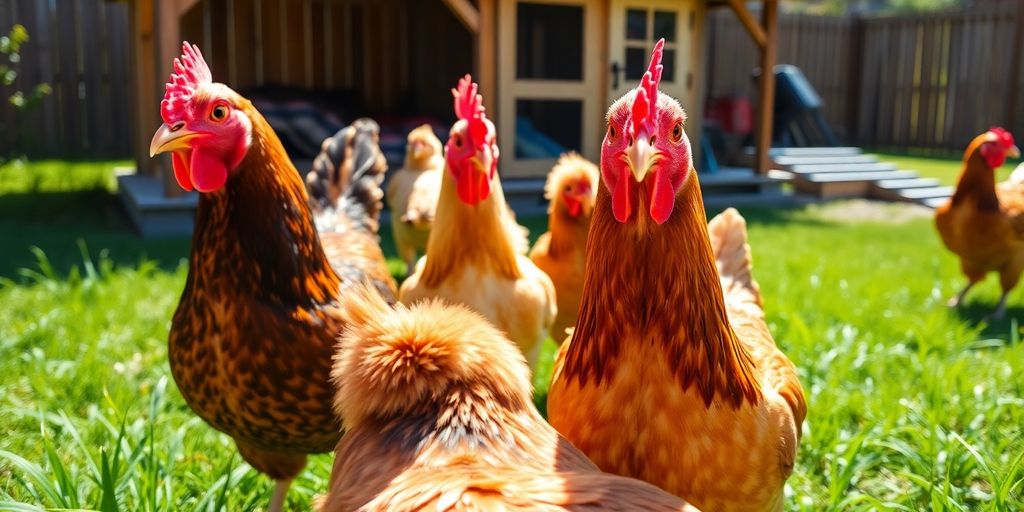
Selecting The Right Breeds For Egg Production
Choosing the right chicken breed is a big deal if you’re after lots of eggs. Not all chickens are created equal when it comes to laying! Some breeds are egg-laying machines, while others are more suited for other things, like being pretty or good meat birds. It’s all about figuring out what you want from your flock.
Popular Egg-Laying Breeds
Okay, so you want eggs, huh? Here are a few breeds known for their egg-cellent production:
- Leghorns: These are your classic white egg layers. They’re super productive but can be a bit flighty.
- Rhode Island Reds: These are hardy birds that lay brown eggs. They’re known for being pretty resilient and good layers, even in less-than-ideal conditions.
- Golden Comets: These are friendly and lay a ton of eggs, but they don’t live as long since they’re bred for commercial egg production.
- Orpingtons: These are larger, friendly birds that are also good layers. They’re cold-hardy, too!
- Easter Eggers: These are fun because they lay different colored eggs – blue, green, you name it! They’re also pretty smart and can handle different weather conditions.
Understanding Breed Temperament
Temperament matters! Some chickens are chill, others are a bit crazy. You’ll want to think about this, especially if you have kids or other pets. Some breeds are just naturally friendlier and easier to handle. Others might be more independent or even a little aggressive. It really depends on what you’re looking for in a backyard flock.
Climate Considerations For Breeds
Where you live makes a difference. Some chickens handle cold weather better than others, while some thrive in the heat. For example, cold-hardy breeds like Wyandottes or Orpingtons are great if you live in a place with harsh winters. If you’re in a warmer climate, consider breeds like Leghorns or Easter Eggers that can tolerate the heat. Picking the right breed for your climate will help keep your chickens happy and healthy, which means more eggs for you!
It’s a good idea to do your homework before you get chicks. Think about what’s important to you – egg color, temperament, how well they handle the weather – and then find breeds that fit the bill. There are tons of options out there, so take your time and choose wisely!
Maintaining A Healthy Chicken Environment
Raising chickens isn’t just about providing food and water; it’s about creating a thriving environment where they can flourish. A healthy environment directly translates to happier hens and, of course, more eggs! Let’s explore the key aspects of keeping your chickens in tip-top shape.
Coop Design And Space Requirements
First things first, your coop needs to be more than just a shelter; it needs to be a well-designed haven. Think of it as their home, and you’re the architect. Overcrowding is a big no-no. Chickens need space to move around, roost, and just generally be chickens. A good rule of thumb is at least 4 square feet of coop space per bird and 8-10 square feet of run space.
Here’s a quick guide:
- Roosting Bars: Provide ample roosting space, about 8-12 inches per bird.
- Nesting Boxes: One nesting box for every 3-4 hens is usually sufficient.
- Ventilation: Proper ventilation is key to prevent moisture buildup and ammonia smells. Make sure there are openings near the top of the coop for air circulation.
A well-ventilated coop is a happy coop. Stale air can lead to respiratory problems, so don’t skimp on airflow. But also, make sure it’s not drafty! Chickens don’t like drafts any more than we do.
Pest Management Strategies
Pests are a constant battle when raising chickens. Mites, lice, and rodents can all cause problems. Regular coop cleaning is your first line of defense. Remove soiled bedding frequently and replace it with fresh material.
Here are some other strategies:
- Diatomaceous Earth: This natural powder can be sprinkled in the coop and run to control mites and lice. Make sure to use food-grade diatomaceous earth.
- Regular Inspections: Check your chickens regularly for signs of pests. Look for mites around the vent area.
- Rodent Control: Keep feed stored in sealed containers to prevent attracting rodents. Consider using traps if you have a rodent problem.
Regular Health Checks And Care
Just like any other animal, chickens need regular health checks. Keep an eye out for any signs of illness, such as lethargy, loss of appetite, or changes in droppings. Early detection is key to preventing serious health problems. Make sure they have consistent access to clean drinking water.
Here’s a simple checklist:
- Check for external parasites: Look for mites, lice, or other pests on their skin and feathers.
- Monitor droppings: Healthy droppings should be firm and brown with a white cap. Changes in color or consistency can indicate a problem.
- Observe behavior: Watch for signs of lethargy, decreased appetite, or changes in social behavior.
By following these guidelines, you can create a healthy and happy environment for your chickens, leading to a bountiful supply of fresh eggs and a rewarding experience for you.
Final Thoughts on Raising Chickens for Eggs
So, there you have it! Raising chickens for eggs can be a fun and fulfilling journey. You’ll get to enjoy fresh eggs, and it’s a great way to teach kids about responsibility. Just remember, it takes time and patience to get everything right. Don’t stress if things don’t go perfectly at first; it’s all part of the learning curve. Keep an eye on your flock, give them the care they need, and soon enough, you’ll be reaping the rewards of your hard work. Happy chicken raising!
Frequently Asked Questions
What are the main reasons to raise chickens for eggs?
Raising chickens gives you fresh eggs that taste better than store-bought ones. It’s also a fun project for kids and helps you feel more self-sufficient.
When is the best time to start raising chicks?
Spring is the ideal season because the weather is mild. You should get your chicks about 5-6 weeks before the last frost date so they can grow feathers.
Where can I buy baby chicks?
You can find chicks at local hatcheries, order them online, or even hatch your own from fertilized eggs if you have a rooster.
What do I need to set up for baby chicks?
You will need a brooder with heat lamps, food, water, and bedding to keep them comfortable and safe.
How do I care for my chickens as they grow?
As chickens grow, you need to move them to a coop, make sure they have good food, and handle them gently to keep them friendly.
What breeds are best for egg production?
Some popular breeds for laying eggs include Rhode Island Reds, Leghorns, and Sussex. Choose a breed that fits your climate and personality needs.